
Showing posts with label DIY. Show all posts
How to Make a Luna Coin Felt Pouch Tutorial
How to make a Coin Pouch tutorial : Luna from Sailor Moon


How to make a Coin Pouch : This weeks tutorial is of a Luna from the Sailor Moon anime and manga. A kawaii kitty cat of Usagi with a crescent moon on her forehead. Her head is stuffed like a plush and her body is the pouch. Take her along with you while she carries your change or other small items inside of her Velcro seal-able pouch.
Sailor Moon is a popular anime and manga series that has been around for a good while. And Luna is one of my favorite characters of the series. She is such an adorable kitty and is perfect for making a plush or plush related items with. I really wanted to make something Sailor Moon related because a whole new series is in production and should be out sometime this year.
As with a lot of my other tutorials, you do not need to sew everything on. The entire face of Luna can be glued on instead of being sewn on if that is what you prefer. Stuffing the head is also entirely optional. Feel free to place the tail anywhere you want. Remember this is YOUR project and you can do what ever you want! Hope you enjoy this, please message me for any questions. Hugz!
Template:
How to Make a Snow Hello Kitty ornament plushie tutorial
How to make a plushie tutorial : Snow Hello Kitty ornament


How to make a plushie : This weeks plushie tutorial is of Hello Kitty snowman from Sanrio. This holiday make a kawaii ornament for hanging with Hello Kitty. Make one as a gift or decorate your tree with. This is part of a holiday collab with the following youtubers:

Why have just a snowman ornament when you slap some kawaii-ness on it and make it a Snow Hello Kitty? Make it with all sorts of color schemes and don't be afraid to experiment! Try not to make her to big as you don't want her being too heavy for a tree branch.

Nearly all parts of this plush can be glued on. So, choose what is best for you and start making these to decorate your home or someone else's home by gifting it to them. Hugz, do send me any question or comments. Get creative and Enjoy your holiday season. ^_^
Template:

How to Make a Buru Buru Dog Ornament plushie tutorial
How to make a plushie tutorial : Buru Buru Dog Ornament


How to make a plushie : This weeks plushie tutorial is of Buru Buru Dog from San-X. This holiday make a kawaii ornament for hanging with Buru Buru Dog. The poor trembling dog is always scared but will be brave to look cute for you while holding a little treat. Make one as a gift or decorate your tree with. This is a collab tutorial with my BFF Aiko Miyoko from the HapyFirendsShoppe. You can view her tutorial here.

Buru Buru Dog was released before 2000 and his tail changes color. When scared his tail will be blue and when showing love, his tail will be pink. He loves polka do underwear and is oh so darn cute! Don't you just wanna hug this poor trembling thing and calm him down?

You can use glue to hold the paws together and for keeping the tip of the hat drooping over his face. Also, he doesn't necessarily need to be holding candy canes. Get creative and Enjoy your holiday season. ^_^
Template:

How to Make a Totoro Drawstring Bag tutorial
How to make a plushie tutorial : Totoro Felt Drawstring Bag


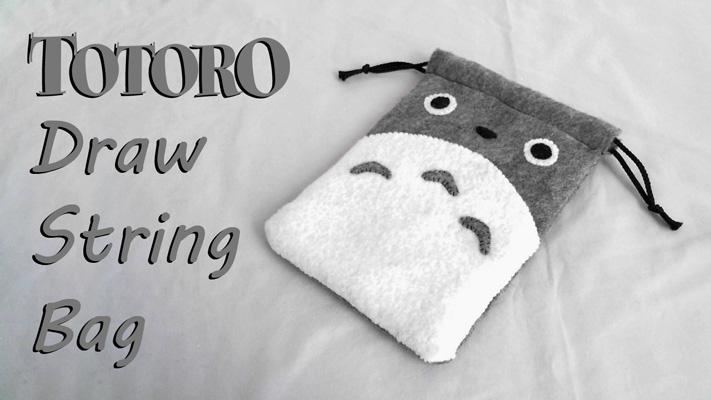


How to make a plushie : This weeks DIY tutorial is on a felt Totoro Drawstring Bag. Make a cute bag featuring Studio Ghibli's Totoro with lining and drawstring. Use the template to come up with your very own designs.
I haven't met anyone who doesn't like Totoro. So I thought he would be a perfect character to design my first drawstring bag with. His little face fits very well on the bag and raises the cute factor to a million plus!
Have another character you would rather want? Don't be afraid to experiment. Put something else on the bag. This isn't a Totoro exclusive design. So get creative and show me what you come up with! I would love to see what you all make. Enjoy and do send me your creations here. Hugz
Full template:

Printable Template:


How to Make a Rilakkuma Zipper Felt Pouch tutorial
How to make a plushie tutorial : Rilakkuma Zipper Felt Pouch

How to make a plushie : This weeks DIY tutorial is on a felt Rilakkuma zipper pouch. Make a cute pouch with lining, zipper, and ribbon featuring San-X's Rilakkuma and his ears sticking out. A do it yourself project that anyone can accomplish, have fun and show your work! Enjoy!
*Remember to OPEN you zipper at least half way BEFORE applying the back stitching around the pouch before turning it inside out.
You can use another type of fabric for the lining of your pouch. Choose one with print, a thinner fabric than felt, or something that is abit more durable for a longer pouch life.
Remember this is just an example of how to make a puch with a zipper. Feel free to use the template and alter it to you liking. Make other characters or whatever your creative minds can think of! The possibilities are endless!
Template:


  |
| Rilakkuma Tissue Pouch Tut here |
How to make a plushie : This weeks DIY tutorial is on a felt Rilakkuma zipper pouch. Make a cute pouch with lining, zipper, and ribbon featuring San-X's Rilakkuma and his ears sticking out. A do it yourself project that anyone can accomplish, have fun and show your work! Enjoy!
*Remember to OPEN you zipper at least half way BEFORE applying the back stitching around the pouch before turning it inside out.
You can use another type of fabric for the lining of your pouch. Choose one with print, a thinner fabric than felt, or something that is abit more durable for a longer pouch life.
Remember this is just an example of how to make a puch with a zipper. Feel free to use the template and alter it to you liking. Make other characters or whatever your creative minds can think of! The possibilities are endless!
Template:

DIY Fashion : Sharpie Super Mario T-Shirt Tutorial
DIY Fashion : Sharpie Super Mario T-Shirt Tutorial


DIY Fashion Tutorial : Make your own Super Mario T-shirt using sharpie permanent markers. Looking to spice up an old Polo Shirt I decided to make my very first fashion tutorial.
-Use light strokes on template of your choice and then go back over it to make the lines more bold. -Always make sure you have something inside the shirt before drawing on it so the ink doesn't leak through to the other side.
-Iron the shirt after the ink has dried to set it in the fabric. (optional)
-If you get dizzy from the smell of the marker, take a break.
-Have fun!
Template:

How to make a Mother's Day Picture Frame
Happy Mother's Day!


Happy mother's day to all the lovely mothers out there. Make mama a cute picture frame from scratch! This tutorial serves just as a basic guide. You can personalize to your hearts content! Play with some ideas and as always, have fun. Perfect gift for any occasion ~_^ Come up with any designs you want. Enjoy!
Template:

Blood+ : Hagi Inspired DIY Pouch From Felt Tutorial
Blood+ Hagi Pouch!


Have fun making this little pouch based on Hagi's cello case from the anime Blood +. Both Aiko and I had a lot of fun making this for u. Enjoy! Watch Aiko hold a katana like Saya! And Bubs as he role plays as Hagi!
Template:





Have fun making this little pouch based on Hagi's cello case from the anime Blood +. Both Aiko and I had a lot of fun making this for u. Enjoy! Watch Aiko hold a katana like Saya! And Bubs as he role plays as Hagi!
Aiko's video
http://youtu.be/YlWGefhPguo
http://youtu.be/YlWGefhPguo
Template:

How to Make a Chibi Hatsune Miku Magnet from felt tutorial
Miku Magnet!


Make your very own magnets with felt! Together we make a Hatsune Miku Chibi magnet! Come up with your very own ideas and go magnet crazy! Enjoy! ;)
Template:

DIY: Romeo's Felt Wings Ring Tutorial
Romeo' Wings


Template:


Romeo receives a pair of wings that will lead him to his Juliet when the time comes. For now he waits and longs for his one and only... Juliet. <3
Collab with Aiko from HapyFriendsShoppe
Aiko's tut:
Template:

How to make kawaii Easter Eggs with pocket tutorial
Easter Eggs!


Put a little something special inside your plushie Easter Eggs this holiday! With the little pouch you can put small candy to make these eggs extra sweet. Decorate them to your hearts desire. Enjoy!
Template:

How to make a Computer Mouse Cover from Felt tutorial
Computer Mouse Cover!


Easy to make simple dust mouse cover for your PC mouse. ^_^ Fully customizable to fit ur personality. Have fun and show ur creations! ;)
Template:

DIY Rilakkuma リラック Pocket Tissue Pouch

 Rilakkuma リラック Tissue Pouch!


Collaboration tutorial with Carmen Pay from CarmenPay Craft on youtube. Do check out her Gloomy Bear Pouch. My pouch is based on Rilakkuma リラック and is uber cute and simple to make. Wow your friends when you pull this out and hand them a tissue. Have fun making it and you can also make up your own designs. ^_^
CarmenPay Craft's Tutorial
http://youtu.be/w4YAjj54qDw
Template:


